Notice
This document is for a development version of Ceph.
Manually editing the CRUSH Map
Note
Manually editing the CRUSH map is an advanced administrator operation. For the majority of installations, CRUSH changes can be implemented via the Ceph CLI and do not require manual CRUSH map edits. If you have identified a use case where manual edits are necessary with a recent Ceph release, consider contacting the Ceph developers at dev@ceph.io so that future versions of Ceph do not have this problem.
To edit an existing CRUSH map, carry out the following procedure:
Decompile the CRUSH map.
Edit at least one of the following sections: Devices, Buckets, and Rules. Use a text editor for this task.
Recompile the CRUSH map.
For details on setting the CRUSH map rule for a specific pool, see Set Pool Values.
Get the CRUSH Map
To get the CRUSH map for your cluster, run a command of the following form:
ceph osd getcrushmap -o {compiled-crushmap-filename}
Ceph outputs (-o) a compiled CRUSH map to the filename that you have
specified. Because the CRUSH map is in a compiled form, you must first
decompile it before you can edit it.
Decompile the CRUSH Map
To decompile the CRUSH map, run a command of the following form:
crushtool -d {compiled-crushmap-filename} -o {decompiled-crushmap-filename}
Recompile the CRUSH Map
To compile the CRUSH map, run a command of the following form:
crushtool -c {decompiled-crushmap-filename} -o {compiled-crushmap-filename}
Set the CRUSH Map
To set the CRUSH map for your cluster, run a command of the following form:
ceph osd setcrushmap -i {compiled-crushmap-filename}
Ceph loads (-i) a compiled CRUSH map from the filename that you have
specified.
Sections
A CRUSH map has six main sections:
tunables: The preamble at the top of the map describes any tunables that are not a part of legacy CRUSH behavior. These tunables correct for old bugs, optimizations, or other changes that have been made over the years to improve CRUSH’s behavior.
devices: Devices are individual OSDs that store data.
types: Bucket
typesdefine the types of buckets that are used in your CRUSH hierarchy.buckets: Buckets consist of a hierarchical aggregation of storage locations (for example, rows, racks, chassis, hosts) and their assigned weights. After the bucket
typeshave been defined, the CRUSH map defines each node in the hierarchy, its type, and which devices or other nodes it contains.rules: Rules define policy about how data is distributed across devices in the hierarchy.
choose_args:
choose_argsare alternative weights associated with the hierarchy that have been adjusted in order to optimize data placement. A singlechoose_argsmap can be used for the entire cluster, or a number ofchoose_argsmaps can be created such that each map is crafted for a particular pool.
CRUSH-Map Devices
Devices are individual OSDs that store data. In this section, there is usually
one device defined for each OSD daemon in your cluster. Devices are identified
by an id (a non-negative integer) and a name (usually osd.N, where
N is the device’s id).
A device can also have a device class associated with it: for example,
hdd or ssd. Device classes make it possible for devices to be targeted
by CRUSH rules. This means that device classes allow CRUSH rules to select only
OSDs that match certain characteristics. For example, you might want an RBD
pool associated only with SSDs and a different RBD pool associated only with
HDDs.
To see a list of devices, run the following command:
ceph device ls
The output of this command takes the following form:
device {num} {osd.name} [class {class}]
For example:
ceph device ls
device 0 osd.0 class ssd
device 1 osd.1 class hdd
device 2 osd.2
device 3 osd.3
In most cases, each device maps to a corresponding ceph-osd daemon. This
daemon might map to a single storage device, a pair of devices (for example,
one for data and one for a journal or metadata), or in some cases a small RAID
device or a partition of a larger storage device.
CRUSH-Map Bucket Types
The second list in the CRUSH map defines ‘bucket’ types. Buckets facilitate a
hierarchy of nodes and leaves. Node buckets (also known as non-leaf buckets)
typically represent physical locations in a hierarchy. Nodes aggregate other
nodes or leaves. Leaf buckets represent ceph-osd daemons and their
corresponding storage media.
Tip
In the context of CRUSH, the term “bucket” is used to refer to a node in the hierarchy (that is, to a location or a piece of physical hardware). In the context of RADOS Gateway APIs, however, the term “bucket” has a different meaning.
To add a bucket type to the CRUSH map, create a new line under the list of
bucket types. Enter type followed by a unique numeric ID and a bucket name.
By convention, there is exactly one leaf bucket type and it is type 0;
however, you may give the leaf bucket any name you like (for example: osd,
disk, drive, storage):
# types
type {num} {bucket-name}
For example:
# types
type 0 osd
type 1 host
type 2 chassis
type 3 rack
type 4 row
type 5 pdu
type 6 pod
type 7 room
type 8 datacenter
type 9 zone
type 10 region
type 11 root
CRUSH-Map Bucket Hierarchy
The CRUSH algorithm distributes data objects among storage devices according to a per-device weight value, approximating a uniform probability distribution. CRUSH distributes objects and their replicas according to the hierarchical cluster map you define. The CRUSH map represents the available storage devices and the logical elements that contain them.
To map placement groups (PGs) to OSDs across failure domains, a CRUSH map
defines a hierarchical list of bucket types under #types in the generated
CRUSH map. The purpose of creating a bucket hierarchy is to segregate the leaf
nodes according to their failure domains (for example: hosts, chassis, racks,
power distribution units, pods, rows, rooms, and data centers). With the
exception of the leaf nodes that represent OSDs, the hierarchy is arbitrary and
you may define it according to your own needs.
We recommend adapting your CRUSH map to your preferred hardware-naming conventions and using bucket names that clearly reflect the physical hardware. Clear naming practice can make it easier to administer the cluster and easier to troubleshoot problems when OSDs malfunction (or other hardware malfunctions) and the administrator needs access to physical hardware.
In the following example, the bucket hierarchy has a leaf bucket named osd
and two node buckets named host and rack:
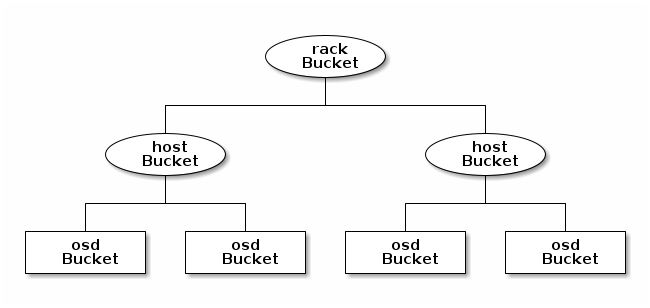
Note
The higher-numbered rack bucket type aggregates the
lower-numbered host bucket type.
Because leaf nodes reflect storage devices that have already been declared
under the #devices list at the beginning of the CRUSH map, there is no need
to declare them as bucket instances. The second-lowest bucket type in your
hierarchy is typically used to aggregate the devices (that is, the
second-lowest bucket type is usually the computer that contains the storage
media and, such as node, computer, server, host, or
machine). In high-density environments, it is common to have multiple hosts
or nodes in a single chassis (for example, in the cases of blades or twins). It
is important to anticipate the potential consequences of chassis failure -- for
example, during the replacement of a chassis in case of a node failure, the
chassis’s hosts or nodes (and their associated OSDs) will be in a down
state.
To declare a bucket instance, do the following: specify its type, give it a
unique name (an alphanumeric string), assign it a unique ID expressed as a
negative integer (this is optional), assign it a weight relative to the total
capacity and capability of the item(s) in the bucket, assign it a bucket
algorithm (usually straw2), and specify the bucket algorithm’s hash
(usually 0, a setting that reflects the hash algorithm rjenkins1). A
bucket may have one or more items. The items may consist of node buckets or
leaves. Items may have a weight that reflects the relative weight of the item.
To declare a node bucket, use the following syntax:
[bucket-type] [bucket-name] {
    id [a unique negative numeric ID]
    weight [the relative capacity/capability of the item(s)]
    alg [the bucket type: uniform | list | tree | straw | straw2 ]
    hash [the hash type: 0 by default]
    item [item-name] weight [weight]
}
For example, in the above diagram, two host buckets (referred to in the
declaration below as node1 and node2) and one rack bucket (referred to
in the declaration below as rack1) are defined. The OSDs are declared as
items within the host buckets:
host node1 {
    id -1
    alg straw2
    hash 0
    item osd.0 weight 1.00
    item osd.1 weight 1.00
}

host node2 {
    id -2
    alg straw2
    hash 0
    item osd.2 weight 1.00
    item osd.3 weight 1.00
}

rack rack1 {
    id -3
    alg straw2
    hash 0
    item node1 weight 2.00
    item node2 weight 2.00
}
Note
In this example, the rack bucket does not contain any OSDs. Instead, it contains lower-level host buckets and includes the sum of their weight in the item entry.
Bucket Types
Ceph supports five bucket types. Each bucket type provides a balance between
performance and reorganization efficiency, and each is different from the
others. If you are unsure of which bucket type to use, use the straw2
bucket. For a more technical discussion of bucket types than is offered
here, see Section 3.4 of CRUSH - Controlled, Scalable, Decentralized
Placement of Replicated Data.
The bucket types are as follows:
uniform: Uniform buckets aggregate devices that have exactly the same weight. For example, when hardware is commissioned or decommissioned, it is often done in sets of machines that have exactly the same physical configuration (this can be the case, for example, after bulk purchases). When storage devices have exactly the same weight, you may use the
uniformbucket type, which allows CRUSH to map replicas into uniform buckets in constant time. If your devices have non-uniform weights, you should not use the uniform bucket algorithm.list: List buckets aggregate their content as linked lists. The behavior of list buckets is governed by the RUSHP algorithm. In the behavior of this bucket type, an object is either relocated to the newest device in accordance with an appropriate probability, or it remains on the older devices as before. This results in optimal data migration when items are added to the bucket. The removal of items from the middle or the tail of the list, however, can result in a significant amount of unnecessary data movement. This means that list buckets are most suitable for circumstances in which they never shrink or very rarely shrink.
tree: Tree buckets use a binary search tree. They are more efficient at dealing with buckets that contain many items than are list buckets. The behavior of tree buckets is governed by the RUSHR algorithm. Tree buckets reduce the placement time to 0(logn). This means that tree buckets are suitable for managing large sets of devices or nested buckets.
straw: Straw buckets allow all items in the bucket to “compete” against each other for replica placement through a process analogous to drawing straws. This is different from the behavior of list buckets and tree buckets, which use a divide-and-conquer strategy that either gives certain items precedence (for example, those at the beginning of a list) or obviates the need to consider entire subtrees of items. Such an approach improves the performance of the replica placement process, but can also introduce suboptimal reorganization behavior when the contents of a bucket change due an addition, a removal, or the re-weighting of an item.
straw2: Straw2 buckets improve on Straw by correctly avoiding any data movement between items when neighbor weights change. For example, if the weight of a given item changes (including during the operations of adding it to the cluster or removing it from the cluster), there will be data movement to or from only that item. Neighbor weights are not taken into account.
Hash
Each bucket uses a hash algorithm. As of Reef, Ceph supports the
rjenkins1 algorithm. To select rjenkins1 as the hash algorithm,
enter 0 as your hash setting.
Weighting Bucket Items
Ceph expresses bucket weights as doubles, which allows for fine-grained
weighting. A weight is the relative difference between device capacities. We
recommend using 1.00 as the relative weight for a 1 TB storage device.
In such a scenario, a weight of 0.50 would represent approximately 500
GB, and a weight of 3.00 would represent approximately 3 TB. Buckets
higher in the CRUSH hierarchy have a weight that is the sum of the weight of
the leaf items aggregated by the bucket.
CRUSH Map Rules
CRUSH maps have rules that include data placement for a pool: these are called “CRUSH rules”. The default CRUSH map has one rule for each pool. If you are running a large cluster, you might create many pools and each of those pools might have its own non-default CRUSH rule.
Note
In most cases, there is no need to modify the default rule. When a
new pool is created, by default the rule will be set to the value 0
(which indicates the default CRUSH rule, which has the numeric ID 0).
CRUSH rules define policy that governs how data is distributed across the devices in the hierarchy. The rules define placement as well as replication strategies or distribution policies that allow you to specify exactly how CRUSH places data replicas. For example, you might create one rule selecting a pair of targets for two-way mirroring, another rule for selecting three targets in two different data centers for three-way replication, and yet another rule for erasure coding across six storage devices. For a detailed discussion of CRUSH rules, see Section 3.2 of CRUSH - Controlled, Scalable, Decentralized Placement of Replicated Data.
A normal CRUSH rule takes the following form:
rule <rulename> {

    id [a unique integer ID]
    type [replicated|erasure]
    step take <bucket-name> [class <device-class>]
    step [choose|chooseleaf] [firstn|indep] <N> type <bucket-type>
    step emit
}
CRUSH MSR (Multi-Step Retry) rules are a distinct type of CRUSH rule which supports retrying steps and provides better support for configurations that require multiple OSDs within each failure domain. MSR rules take the following form:
rule <rulename> {

    id [a unique integer ID]
    type [msr_indep|msr_firstn]
    step take <bucket-name> [class <device-class>]
    step choosemsr <N> type <bucket-type>
    step emit
}
id- Description
A unique integer that identifies the rule.
- Purpose
A component of the rule mask.
- Type
Integer
- Required
Yes
- Default
0
type- Description
Denotes the type of replication strategy to be enforced by the rule. msr_firstn and msr_indep are a distinct descent algorithm which supports retrying steps within the rule and therefore multiple OSDs per failure domain.
- Purpose
A component of the rule mask.
- Type
String
- Required
Yes
- Default
replicated- Valid Values
replicated,erasure,msr_firstn,msr_indep
step take <bucket-name> [class <device-class>]- Description
Takes a bucket name and iterates down the tree. If the
device-classargument is specified, the argument must match a class assigned to OSDs within the cluster. Only devices belonging to the class are included.- Purpose
A component of the rule.
- Required
Yes
- Example
step take data
step choose firstn {num} type {bucket-type}- Description
Selects
numbuckets of the given type from within the current bucket.{num}is usually the number of replicas in the pool (in other words, the pool size).If
{num} == 0, choosepool-num-replicasbuckets (as many buckets as are available).If
pool-num-replicas > {num} > 0, choose that many buckets.If
{num} < 0, choosepool-num-replicas - {num}buckets.
- Purpose
A component of the rule.
- Prerequisite
Follows
step takeorstep choose.- Example
step choose firstn 1 type row
step chooseleaf firstn {num} type {bucket-type}- Description
Selects a set of buckets of the given type and chooses a leaf node (that is, an OSD) from the subtree of each bucket in that set of buckets. The number of buckets in the set is usually the number of replicas in the pool (in other words, the pool size).
If
{num} == 0, choosepool-num-replicasbuckets (as many buckets as are available).If
pool-num-replicas > {num} > 0, choose that many buckets.If
{num} < 0, choosepool-num-replicas - {num}buckets.
- Purpose
A component of the rule. Using
chooseleafobviates the need to select a device in a separate step.- Prerequisite
Follows
step takeorstep choose.- Example
step chooseleaf firstn 0 type row
step emit- Description
Outputs the current value on the top of the stack and empties the stack. Typically used at the end of a rule, but may also be used to choose from different trees in the same rule.
- Purpose
A component of the rule.
- Prerequisite
Follows
step choose.- Example
step emit
Important
A single CRUSH rule can be assigned to multiple pools, but a single pool cannot have multiple CRUSH rules.
firstn or indep
- Description
Determines which replacement strategy CRUSH uses when items (OSDs) are marked
downin the CRUSH map. When this rule is used with replicated pools,firstnis used. When this rule is used with erasure-coded pools,indepis used.Suppose that a PG is stored on OSDs 1, 2, 3, 4, and 5 and then OSD 3 goes down.
When in
firstnmode, CRUSH simply adjusts its calculation to select OSDs 1 and 2, then selects 3 and discovers that 3 is down, retries and selects 4 and 5, and finally goes on to select a new OSD: OSD 6. The final CRUSH mapping transformation is therefore 1, 2, 3, 4, 5 → 1, 2, 4, 5, 6.However, if you were storing an erasure-coded pool, the above sequence would have changed the data that is mapped to OSDs 4, 5, and 6. The
indepmode attempts to avoid this unwanted consequence. When inindepmode, CRUSH can be expected to select 3, discover that 3 is down, retry, and select 6. The final CRUSH mapping transformation is therefore 1, 2, 3, 4, 5 → 1, 2, 6, 4, 5.
step choosemsr {num} type {bucket-type}- Description
Selects a num buckets of type bucket-type. msr_firstn and msr_indep must use choosemsr rather than choose or chooseleaf.
If
{num} == 0, choosepool-num-replicasbuckets (as many buckets as are available).If
pool-num-replicas > {num} > 0, choose that many buckets.
- Purpose
Choose step required for msr_firstn and msr_indep rules.
- Prerequisite
Follows
step takeand precedesstep emit- Example
step choosemsr 3 type host
Migrating from a legacy SSD rule to device classes
Prior to the Luminous release’s introduction of the device class feature, in order to write rules that applied to a specialized device type (for example, SSD), it was necessary to manually edit the CRUSH map and maintain a parallel hierarchy for each device type. The device class feature provides a more transparent way to achieve this end.
However, if your cluster is migrated from an existing manually-customized per-device map to new device class-based rules, all data in the system will be reshuffled.
The crushtool utility has several commands that can transform a legacy rule
and hierarchy and allow you to start using the new device class rules. There
are three possible types of transformation:
--reclassify-root <root-name> <device-class>This command examines everything under
root-namein the hierarchy and rewrites any rules that reference the specified root and that have the formtake <root-name>so that they instead have the formtake <root-name> class <device-class>. The command also renumbers the buckets in such a way that the old IDs are used for the specified class’s “shadow tree” and as a result no data movement takes place.For example, suppose you have the following as an existing rule:
rule replicated_rule {
   id 0
   type replicated
   step take default
   step chooseleaf firstn 0 type rack
   step emit
}
If the root
defaultis reclassified as classhdd, the new rule will be as follows:rule replicated_rule { id 0 type replicated step take default class hdd step chooseleaf firstn 0 type rack step emit }
--set-subtree-class <bucket-name> <device-class>This command marks every device in the subtree that is rooted at bucket-name with the specified device class.
This command is typically used in conjunction with the
--reclassify-rootoption in order to ensure that all devices in that root are labeled with the correct class. In certain circumstances, however, some of those devices are correctly labeled with a different class and must not be relabeled. To manage this difficulty, one can exclude the--set-subtree-classoption. The remapping process will not be perfect, because the previous rule had an effect on devices of multiple classes but the adjusted rules will map only to devices of the specified device class. However, when there are not many outlier devices, the resulting level of data movement is often within tolerable limits.--reclassify-bucket <match-pattern> <device-class> <default-parent>This command allows you to merge a parallel type-specific hierarchy with the normal hierarchy. For example, many users have maps that resemble the following:
 host node1 {
    id -2           # do not change unnecessarily
    # weight 109.152
    alg straw2
    hash 0  # rjenkins1
    item osd.0 weight 9.096
    item osd.1 weight 9.096
    item osd.2 weight 9.096
    item osd.3 weight 9.096
    item osd.4 weight 9.096
    item osd.5 weight 9.096
    ...
 }

 host node1-ssd {
    id -10          # do not change unnecessarily
    # weight 2.000
    alg straw2
    hash 0  # rjenkins1
    item osd.80 weight 2.000
...
 }

 root default {
    id -1           # do not change unnecessarily
    alg straw2
    hash 0  # rjenkins1
    item node1 weight 110.967
    ...
 }

 root ssd {
    id -18          # do not change unnecessarily
    # weight 16.000
    alg straw2
    hash 0  # rjenkins1
    item node1-ssd weight 2.000
...
 }
This command reclassifies each bucket that matches a certain pattern. The pattern can be of the form
%suffixorprefix%. For example, in the above example, we would use the pattern%-ssd. For each matched bucket, the remaining portion of the name (corresponding to the%wildcard) specifies the base bucket. All devices in the matched bucket are labeled with the specified device class and then moved to the base bucket. If the base bucket does not exist (for example,node12-ssdexists butnode12does not), then it is created and linked under the specified default parent bucket. In each case, care is taken to preserve the old bucket IDs for the new shadow buckets in order to prevent data movement. Any rules withtakesteps that reference the old buckets are adjusted accordingly.--reclassify-bucket <bucket-name> <device-class> <base-bucket>The same command can also be used without a wildcard in order to map a single bucket. For example, in the previous example, we want the
ssdbucket to be mapped to thedefaultbucket.The final command to convert the map that consists of the above fragments resembles the following:
ceph osd getcrushmap -o original
crushtool -i original --reclassify \
  --set-subtree-class default hdd \
  --reclassify-root default hdd \
  --reclassify-bucket %-ssd ssd default \
  --reclassify-bucket ssd ssd default \
  -o adjusted
--compare flag
A --compare flag is available to make sure that the conversion performed in
Migrating from a legacy SSD rule to device classes is
correct. This flag tests a large sample of inputs against the CRUSH map and
checks that the expected result is output. The options that control these
inputs are the same as the options that apply to the --test command. For an
illustration of how this --compare command applies to the above example,
see the following:
crushtool -i original --compare adjusted
rule 0 had 0/10240 mismatched mappings (0)
rule 1 had 0/10240 mismatched mappings (0)
maps appear equivalent
If the command finds any differences, the ratio of remapped inputs is reported in the parentheses.
When you are satisfied with the adjusted map, apply it to the cluster by running the following command:
ceph osd setcrushmap -i adjusted
Manually Tuning CRUSH
If you have verified that all clients are running recent code, you can adjust the CRUSH tunables by extracting the CRUSH map, modifying the values, and reinjecting the map into the cluster. The procedure is carried out as follows:
Extract the latest CRUSH map:
ceph osd getcrushmap -o /tmp/crushAdjust tunables. In our tests, the following values appear to result in the best behavior for both large and small clusters. The procedure requires that you specify the
--enable-unsafe-tunablesflag in thecrushtoolcommand. Use this option with extreme care:crushtool -i /tmp/crush --set-choose-local-tries 0 --set-choose-local-fallback-tries 0 --set-choose-total-tries 50 -o /tmp/crush.newReinject the modified map:
ceph osd setcrushmap -i /tmp/crush.new
Legacy values
To set the legacy values of the CRUSH tunables, run the following command:
crushtool -i /tmp/crush --set-choose-local-tries 2 --set-choose-local-fallback-tries 5 --set-choose-total-tries 19 --set-chooseleaf-descend-once 0 --set-chooseleaf-vary-r 0 -o /tmp/crush.legacy
The special --enable-unsafe-tunables flag is required. Be careful when
running old versions of the ceph-osd daemon after reverting to legacy
values, because the feature bit is not perfectly enforced.
Brought to you by the Ceph Foundation
The Ceph Documentation is a community resource funded and hosted by the non-profit Ceph Foundation. If you would like to support this and our other efforts, please consider joining now.