Block Devices and Kubernetes
You may use Ceph Block Device images with Kubernetes v1.13 and later through ceph-csi, which dynamically provisions RBD images to back Kubernetes volumes and maps these RBD images as block devices (optionally mounting a file system contained within the image) on worker nodes running pods that reference an RBD-backed volume. Ceph stripes block device images as objects across the cluster, which means that large Ceph Block Device images have better performance than a standalone server!
To use Ceph Block Devices with Kubernetes v1.13 and higher, you must install
and configure ceph-csi within your Kubernetes environment. The following
diagram depicts the Kubernetes/Ceph technology stack.
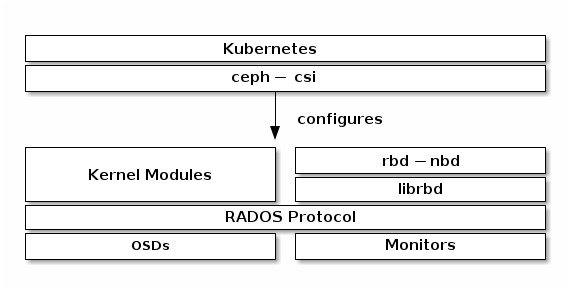
Important
ceph-csi uses the RBD kernel modules by default which may not support all
Ceph CRUSH tunables or RBD image features.
Create a Pool
By default, Ceph block devices use the rbd pool. Create a pool for
Kubernetes volume storage. Ensure your Ceph cluster is running, then create
the pool.
$ ceph osd pool create kubernetes
See Create a Pool for details on specifying the number of placement groups for your pools, and Placement Groups for details on the number of placement groups you should set for your pools.
A newly created pool must be initialized prior to use. Use the rbd tool
to initialize the pool:
$ rbd pool init kubernetes
Configure ceph-csi
Setup Ceph Client Authentication
Create a new user for Kubernetes and ceph-csi. Execute the following and record the generated key:
$ ceph auth get-or-create client.kubernetes mon 'profile rbd' osd 'profile rbd pool=kubernetes' mgr 'profile rbd pool=kubernetes'
[client.kubernetes]
    key = AQD9o0Fd6hQRChAAt7fMaSZXduT3NWEqylNpmg==
Generate ceph-csi ConfigMap
The ceph-csi requires a ConfigMap object stored in Kubernetes to define the the Ceph monitor addresses for the Ceph cluster. Collect both the Ceph cluster unique fsid and the monitor addresses:
$ ceph mon dump
<...>
fsid b9127830-b0cc-4e34-aa47-9d1a2e9949a8
<...>
0: [v2:192.168.1.1:3300/0,v1:192.168.1.1:6789/0] mon.a
1: [v2:192.168.1.2:3300/0,v1:192.168.1.2:6789/0] mon.b
2: [v2:192.168.1.3:3300/0,v1:192.168.1.3:6789/0] mon.c
Note
ceph-csi currently only supports the legacy V1 protocol.
Generate a csi-config-map.yaml file similar to the example below, substituting the fsid for “clusterID”, and the monitor addresses for “monitors”:
$ cat <<EOF > csi-config-map.yaml
---
apiVersion: v1
kind: ConfigMap
data:
  config.json: |-
    [
      {
        "clusterID": "b9127830-b0cc-4e34-aa47-9d1a2e9949a8",
        "monitors": [
          "192.168.1.1:6789",
          "192.168.1.2:6789",
          "192.168.1.3:6789"
        ]
      }
    ]
metadata:
  name: ceph-csi-config
EOF
Once generated, store the new ConfigMap object in Kubernetes:
$ kubectl apply -f csi-config-map.yaml
Recent versions of ceph-csi also require an additional ConfigMap object to define Key Management Service (KMS) provider details. If KMS isn’t set up, put an empty configuration in a csi-kms-config-map.yaml file or refer to examples at https://github.com/ceph/ceph-csi/tree/master/examples/kms:
$ cat <<EOF > csi-kms-config-map.yaml
---
apiVersion: v1
kind: ConfigMap
data:
  config.json: |-
    {}
metadata:
  name: ceph-csi-encryption-kms-config
EOF
Once generated, store the new ConfigMap object in Kubernetes:
$ kubectl apply -f csi-kms-config-map.yaml
Recent versions of ceph-csi also require yet another ConfigMap object to define Ceph configuration to add to ceph.conf file inside CSI containers:
$ cat <<EOF > ceph-config-map.yaml
---
apiVersion: v1
kind: ConfigMap
data:
  ceph.conf: |
    [global]
    auth_cluster_required = cephx
    auth_service_required = cephx
    auth_client_required = cephx
  # keyring is a required key and its value should be empty
  keyring: |
metadata:
  name: ceph-config
EOF
Once generated, store the new ConfigMap object in Kubernetes:
$ kubectl apply -f ceph-config-map.yaml
Generate ceph-csi cephx Secret
ceph-csi requires the cephx credentials for communicating with the Ceph cluster. Generate a csi-rbd-secret.yaml file similar to the example below, using the newly created Kubernetes user id and cephx key:
$ cat <<EOF > csi-rbd-secret.yaml
---
apiVersion: v1
kind: Secret
metadata:
  name: csi-rbd-secret
  namespace: default
stringData:
  userID: kubernetes
  userKey: AQD9o0Fd6hQRChAAt7fMaSZXduT3NWEqylNpmg==
EOF
Once generated, store the new Secret object in Kubernetes:
$ kubectl apply -f csi-rbd-secret.yaml
Configure ceph-csi Plugins
Create the required ServiceAccount and RBAC ClusterRole/ClusterRoleBinding Kubernetes objects. These objects do not necessarily need to be customized for your Kubernetes environment and therefore can be used as-is from the ceph-csi deployment YAMLs:
$ kubectl apply -f https://raw.githubusercontent.com/ceph/ceph-csi/master/deploy/rbd/kubernetes/csi-provisioner-rbac.yaml
$ kubectl apply -f https://raw.githubusercontent.com/ceph/ceph-csi/master/deploy/rbd/kubernetes/csi-nodeplugin-rbac.yaml
Finally, create the ceph-csi provisioner and node plugins. With the possible exception of the ceph-csi container release version, these objects do not necessarily need to be customized for your Kubernetes environment and therefore can be used as-is from the ceph-csi deployment YAMLs:
$ wget https://raw.githubusercontent.com/ceph/ceph-csi/master/deploy/rbd/kubernetes/csi-rbdplugin-provisioner.yaml
$ kubectl apply -f csi-rbdplugin-provisioner.yaml
$ wget https://raw.githubusercontent.com/ceph/ceph-csi/master/deploy/rbd/kubernetes/csi-rbdplugin.yaml
$ kubectl apply -f csi-rbdplugin.yaml
Important
The provisioner and node plugin YAMLs will, by default, pull the development release of the ceph-csi container (quay.io/cephcsi/cephcsi:canary). The YAMLs should be updated to use a release version container for production workloads.
Using Ceph Block Devices
Create a StorageClass
The Kubernetes StorageClass defines a class of storage. Multiple StorageClass objects can be created to map to different quality-of-service levels (i.e. NVMe vs HDD-based pools) and features.
For example, to create a ceph-csi StorageClass that maps to the kubernetes pool created above, the following YAML file can be used after ensuring that the “clusterID” property matches your Ceph cluster’s fsid:
$ cat <<EOF > csi-rbd-sc.yaml
---
apiVersion: storage.k8s.io/v1
kind: StorageClass
metadata:
   name: csi-rbd-sc
provisioner: rbd.csi.ceph.com
parameters:
   clusterID: b9127830-b0cc-4e34-aa47-9d1a2e9949a8
   pool: kubernetes
   imageFeatures: layering
   csi.storage.k8s.io/provisioner-secret-name: csi-rbd-secret
   csi.storage.k8s.io/provisioner-secret-namespace: default
   csi.storage.k8s.io/controller-expand-secret-name: csi-rbd-secret
   csi.storage.k8s.io/controller-expand-secret-namespace: default
   csi.storage.k8s.io/node-stage-secret-name: csi-rbd-secret
   csi.storage.k8s.io/node-stage-secret-namespace: default
reclaimPolicy: Delete
allowVolumeExpansion: true
mountOptions:
   - discard
EOF
$ kubectl apply -f csi-rbd-sc.yaml
Note that in Kubernetes v1.14 and v1.15 volume expansion feature was in alpha status and required enabling ExpandCSIVolumes feature gate.
Create a PersistentVolumeClaim
A PersistentVolumeClaim is a request for abstract storage resources by a user. The PersistentVolumeClaim would then be associated to a Pod resource to provision a PersistentVolume, which would be backed by a Ceph block image. An optional volumeMode can be included to select between a mounted file system (default) or raw block device-based volume.
Using ceph-csi, specifying Filesystem for volumeMode can support both ReadWriteOnce and ReadOnlyMany accessMode claims, and specifying Block for volumeMode can support ReadWriteOnce, ReadWriteMany, and ReadOnlyMany accessMode claims.
For example, to create a block-based PersistentVolumeClaim that utilizes the ceph-csi-based StorageClass created above, the following YAML can be used to request raw block storage from the csi-rbd-sc StorageClass:
$ cat <<EOF > raw-block-pvc.yaml
---
apiVersion: v1
kind: PersistentVolumeClaim
metadata:
  name: raw-block-pvc
spec:
  accessModes:
    - ReadWriteOnce
  volumeMode: Block
  resources:
    requests:
      storage: 1Gi
  storageClassName: csi-rbd-sc
EOF
$ kubectl apply -f raw-block-pvc.yaml
The following demonstrates and example of binding the above PersistentVolumeClaim to a Pod resource as a raw block device:
$ cat <<EOF > raw-block-pod.yaml
---
apiVersion: v1
kind: Pod
metadata:
  name: pod-with-raw-block-volume
spec:
  containers:
    - name: fc-container
      image: fedora:26
      command: ["/bin/sh", "-c"]
      args: ["tail -f /dev/null"]
      volumeDevices:
        - name: data
          devicePath: /dev/xvda
  volumes:
    - name: data
      persistentVolumeClaim:
        claimName: raw-block-pvc
EOF
$ kubectl apply -f raw-block-pod.yaml
To create a file-system-based PersistentVolumeClaim that utilizes the ceph-csi-based StorageClass created above, the following YAML can be used to request a mounted file system (backed by an RBD image) from the csi-rbd-sc StorageClass:
$ cat <<EOF > pvc.yaml
---
apiVersion: v1
kind: PersistentVolumeClaim
metadata:
  name: rbd-pvc
spec:
  accessModes:
    - ReadWriteOnce
  volumeMode: Filesystem
  resources:
    requests:
      storage: 1Gi
  storageClassName: csi-rbd-sc
EOF
$ kubectl apply -f pvc.yaml
The following demonstrates and example of binding the above PersistentVolumeClaim to a Pod resource as a mounted file system:
$ cat <<EOF > pod.yaml
---
apiVersion: v1
kind: Pod
metadata:
  name: csi-rbd-demo-pod
spec:
  containers:
    - name: web-server
      image: nginx
      volumeMounts:
        - name: mypvc
          mountPath: /var/lib/www/html
  volumes:
    - name: mypvc
      persistentVolumeClaim:
        claimName: rbd-pvc
        readOnly: false
EOF
$ kubectl apply -f pod.yaml