Multi-Site
New in version Jewel.
A single zone configuration typically consists of one zone group containing one zone and one or more ceph-radosgw instances where you may load-balance gateway client requests between the instances. In a single zone configuration, typically multiple gateway instances point to a single Ceph storage cluster. However, Kraken supports several multi-site configuration options for the Ceph Object Gateway:
Multi-zone: A more advanced configuration consists of one zone group and multiple zones, each zone with one or more ceph-radosgw instances. Each zone is backed by its own Ceph Storage Cluster. Multiple zones in a zone group provides disaster recovery for the zone group should one of the zones experience a significant failure. In Kraken, each zone is active and may receive write operations. In addition to disaster recovery, multiple active zones may also serve as a foundation for content delivery networks.
Multi-zone-group: Formerly called ‘regions’, Ceph Object Gateway can also support multiple zone groups, each zone group with one or more zones. Objects stored to zones in one zone group within the same realm as another zone group will share a global object namespace, ensuring unique object IDs across zone groups and zones.
Multiple Realms: In Kraken, the Ceph Object Gateway supports the notion of realms, which can be a single zone group or multiple zone groups and a globally unique namespace for the realm. Multiple realms provide the ability to support numerous configurations and namespaces.
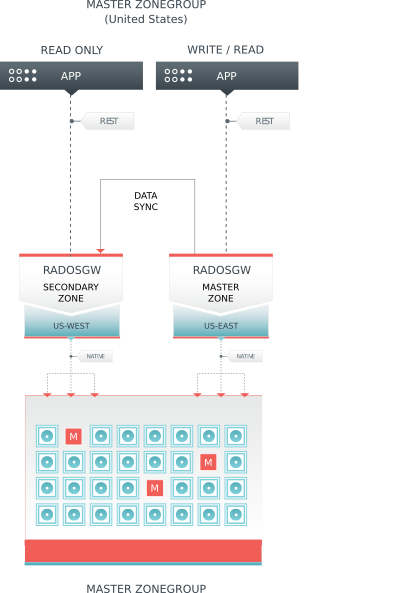
Replicating object data between zones within a zone group looks something like this:
For additional details on setting up a cluster, see Ceph Object Gateway for Production.
Functional Changes from Infernalis
In Kraken, you can configure each Ceph Object Gateway to work in an active-active zone configuration, allowing for writes to non-master zones.
The multi-site configuration is stored within a container called a
“realm.” The realm stores zone groups, zones, and a time “period” with
multiple epochs for tracking changes to the configuration. In Kraken,
the ceph-radosgw daemons handle the synchronization,
eliminating the need for a separate synchronization agent. Additionally,
the new approach to synchronization allows the Ceph Object Gateway to
operate with an “active-active” configuration instead of
“active-passive”.
Requirements and Assumptions
A multi-site configuration requires at least two Ceph storage clusters, preferably given a distinct cluster name. At least two Ceph object gateway instances, one for each Ceph storage cluster.
This guide assumes at least two Ceph storage clusters are in geographically
separate locations; however, the configuration can work on the same
site. This guide also assumes two Ceph object gateway servers named
rgw1 and rgw2.
Important
Running a single Ceph storage cluster is NOT recommended unless you have low latency WAN connections.
A multi-site configuration requires a master zone group and a master zone. Additionally, each zone group requires a master zone. Zone groups may have one or more secondary or non-master zones.
In this guide, the rgw1 host will serve as the master zone of the
master zone group; and, the rgw2 host will serve as the secondary zone
of the master zone group.
See Pools for instructions on creating and tuning pools for Ceph Object Storage.
Configuring a Master Zone
All gateways in a multi-site configuration will retrieve their
configuration from a ceph-radosgw daemon on a host within the master
zone group and master zone. To configure your gateways in a multi-site
configuration, choose a ceph-radosgw instance to configure the
master zone group and master zone.
Create a Realm
A realm contains the multi-site configuration of zone groups and zones and also serves to enforce a globally unique namespace within the realm.
Create a new realm for the multi-site configuration by opening a command line interface on a host identified to serve in the master zone group and zone. Then, execute the following:
# radosgw-admin realm create --rgw-realm={realm-name} [--default]
For example:
# radosgw-admin realm create --rgw-realm=movies --default
If the cluster will have a single realm, specify the --default flag.
If --default is specified, radosgw-admin will use this realm by
default. If --default is not specified, adding zone-groups and zones
requires specifying either the --rgw-realm flag or the
--realm-id flag to identify the realm when adding zone groups and
zones.
After creating the realm, radosgw-admin will echo back the realm
configuration. For example:
{
    "id": "0956b174-fe14-4f97-8b50-bb7ec5e1cf62",
    "name": "movies",
    "current_period": "1950b710-3e63-4c41-a19e-46a715000980",
    "epoch": 1
}
Note
Ceph generates a unique ID for the realm, which allows the renaming of a realm if the need arises.
Create a Master Zone Group
A realm must have at least one zone group, which will serve as the master zone group for the realm.
Create a new master zone group for the multi-site configuration by opening a command line interface on a host identified to serve in the master zone group and zone. Then, execute the following:
# radosgw-admin zonegroup create --rgw-zonegroup={name} --endpoints={url} [--rgw-realm={realm-name}|--realm-id={realm-id}] --master --default
For example:
# radosgw-admin zonegroup create --rgw-zonegroup=us --endpoints=http://rgw1:80 --rgw-realm=movies --master --default
If the realm will only have a single zone group, specify the
--default flag. If --default is specified, radosgw-admin
will use this zone group by default when adding new zones. If
--default is not specified, adding zones will require either the
--rgw-zonegroup flag or the --zonegroup-id flag to identify the
zone group when adding or modifying zones.
After creating the master zone group, radosgw-admin will echo back
the zone group configuration. For example:
{
    "id": "f1a233f5-c354-4107-b36c-df66126475a6",
    "name": "us",
    "api_name": "us",
    "is_master": "true",
    "endpoints": [
        "http:\/\/rgw1:80"
    ],
    "hostnames": [],
    "hostnames_s3webzone": [],
    "master_zone": "",
    "zones": [],
    "placement_targets": [],
    "default_placement": "",
    "realm_id": "0956b174-fe14-4f97-8b50-bb7ec5e1cf62"
}
Create a Master Zone
Important
Zones must be created on a Ceph Object Gateway node that will be within the zone.
Create a new master zone for the multi-site configuration by opening a command line interface on a host identified to serve in the master zone group and zone. Then, execute the following:
# radosgw-admin zone create --rgw-zonegroup={zone-group-name} \
                            --rgw-zone={zone-name} \
                            --master --default \
                            --endpoints={http://fqdn}[,{http://fqdn}]
For example:
# radosgw-admin zone create --rgw-zonegroup=us --rgw-zone=us-east \
                            --master --default \
                            --endpoints={http://fqdn}[,{http://fqdn}]
Note
The --access-key and --secret aren’t specified. These
settings will be added to the zone once the user is created in the
next section.
Important
The following steps assume a multi-site configuration using newly
installed systems that aren’t storing data yet. DO NOT DELETE the
default zone and its pools if you are already using it to store
data, or the data will be deleted and unrecoverable.
Delete Default Zone Group and Zone
Delete the default zone if it exists. Make sure to remove it from
the default zone group first.
# radosgw-admin zonegroup remove --rgw-zonegroup=default --rgw-zone=default
# radosgw-admin period update --commit
# radosgw-admin zone rm --rgw-zone=default
# radosgw-admin period update --commit
# radosgw-admin zonegroup delete --rgw-zonegroup=default
# radosgw-admin period update --commit
Finally, delete the default pools in your Ceph storage cluster if
they exist.
Important
The following step assumes a multi-site configuration using newly
installed systems that aren’t currently storing data. DO NOT DELETE
the default zone group if you are already using it to store
data.
# ceph osd pool rm default.rgw.control default.rgw.control --yes-i-really-really-mean-it
# ceph osd pool rm default.rgw.data.root default.rgw.data.root --yes-i-really-really-mean-it
# ceph osd pool rm default.rgw.gc default.rgw.gc --yes-i-really-really-mean-it
# ceph osd pool rm default.rgw.log default.rgw.log --yes-i-really-really-mean-it
# ceph osd pool rm default.rgw.users.uid default.rgw.users.uid --yes-i-really-really-mean-it
Create a System User
The ceph-radosgw daemons must authenticate before pulling realm and
period information. In the master zone, create a system user to
facilitate authentication between daemons.
# radosgw-admin user create --uid="{user-name}" --display-name="{Display Name}" --system
For example:
# radosgw-admin user create --uid="synchronization-user" --display-name="Synchronization User" --system
Make a note of the access_key and secret_key, as the secondary
zones will require them to authenticate with the master zone.
Finally, add the system user to the master zone.
# radosgw-admin zone modify --rgw-zone=us-east --access-key={access-key} --secret={secret}
# radosgw-admin period update --commit
Update the Period
After updating the master zone configuration, update the period.
# radosgw-admin period update --commit
Note
Updating the period changes the epoch, and ensures that other zones will receive the updated configuration.
Update the Ceph Configuration File
Update the Ceph configuration file on master zone hosts by adding the
rgw_zone configuration option and the name of the master zone to the
instance entry.
[client.rgw.{instance-name}]
...
rgw_zone={zone-name}
For example:
[client.rgw.rgw1]
host = rgw1
rgw frontends = "civetweb port=80"
rgw_zone=us-east
Start the Gateway
On the object gateway host, start and enable the Ceph Object Gateway service:
# systemctl start ceph-radosgw@rgw.`hostname -s`
# systemctl enable ceph-radosgw@rgw.`hostname -s`
Configure Secondary Zones
Zones within a zone group replicate all data to ensure that each zone has the same data. When creating the secondary zone, execute all of the following operations on a host identified to serve the secondary zone.
Note
To add a third zone, follow the same procedures as for adding the secondary zone. Use different zone name.
Important
You must execute metadata operations, such as user creation, on a host within the master zone. The master zone and the secondary zone can receive bucket operations, but the secondary zone redirects bucket operations to the master zone. If the master zone is down, bucket operations will fail.
Pull the Realm
Using the URL path, access key and secret of the master zone in the
master zone group, pull the realm configuration to the host. To pull a
non-default realm, specify the realm using the --rgw-realm or
--realm-id configuration options.
# radosgw-admin realm pull --url={url-to-master-zone-gateway} --access-key={access-key} --secret={secret}
Note
Pulling the realm also retrieves the remote’s current period configuration, and makes it the current period on this host as well.
If this realm is the default realm or the only realm, make the realm the default realm.
# radosgw-admin realm default --rgw-realm={realm-name}
Create a Secondary Zone
Important
Zones must be created on a Ceph Object Gateway node that will be within the zone.
Create a secondary zone for the multi-site configuration by opening a
command line interface on a host identified to serve the secondary zone.
Specify the zone group ID, the new zone name and an endpoint for the
zone. DO NOT use the --master or --default flags. In Kraken,
all zones run in an active-active configuration by
default; that is, a gateway client may write data to any zone and the
zone will replicate the data to all other zones within the zone group.
If the secondary zone should not accept write operations, specify the
--read-only flag to create an active-passive configuration between
the master zone and the secondary zone. Additionally, provide the
access_key and secret_key of the generated system user stored in
the master zone of the master zone group. Execute the following:
# radosgw-admin zone create --rgw-zonegroup={zone-group-name}\
                            --rgw-zone={zone-name} --endpoints={url} \
                            --access-key={system-key} --secret={secret}\
                            --endpoints=http://{fqdn}:80 \
                            [--read-only]
For example:
# radosgw-admin zone create --rgw-zonegroup=us --rgw-zone=us-west \
                            --access-key={system-key} --secret={secret} \
                            --endpoints=http://rgw2:80
Important
The following steps assume a multi-site configuration using newly
installed systems that aren’t storing data. DO NOT DELETE the
default zone and its pools if you are already using it to store
data, or the data will be lost and unrecoverable.
Delete the default zone if needed.
# radosgw-admin zone rm --rgw-zone=default
Finally, delete the default pools in your Ceph storage cluster if needed.
# ceph osd pool rm default.rgw.control default.rgw.control --yes-i-really-really-mean-it
# ceph osd pool rm default.rgw.data.root default.rgw.data.root --yes-i-really-really-mean-it
# ceph osd pool rm default.rgw.gc default.rgw.gc --yes-i-really-really-mean-it
# ceph osd pool rm default.rgw.log default.rgw.log --yes-i-really-really-mean-it
# ceph osd pool rm default.rgw.users.uid default.rgw.users.uid --yes-i-really-really-mean-it
Update the Ceph Configuration File
Update the Ceph configuration file on the secondary zone hosts by adding
the rgw_zone configuration option and the name of the secondary zone
to the instance entry.
[client.rgw.{instance-name}]
...
rgw_zone={zone-name}
For example:
[client.rgw.rgw2]
host = rgw2
rgw frontends = "civetweb port=80"
rgw_zone=us-west
Update the Period
After updating the master zone configuration, update the period.
# radosgw-admin period update --commit
Note
Updating the period changes the epoch, and ensures that other zones will receive the updated configuration.
Start the Gateway
On the object gateway host, start and enable the Ceph Object Gateway service:
# systemctl start ceph-radosgw@rgw.`hostname -s`
# systemctl enable ceph-radosgw@rgw.`hostname -s`
Check Synchronization Status
Once the secondary zone is up and running, check the synchronization status. Synchronization copies users and buckets created in the master zone to the secondary zone.
# radosgw-admin sync status
The output will provide the status of synchronization operations. For example:
realm f3239bc5-e1a8-4206-a81d-e1576480804d (earth)
    zonegroup c50dbb7e-d9ce-47cc-a8bb-97d9b399d388 (us)
         zone 4c453b70-4a16-4ce8-8185-1893b05d346e (us-west)
metadata sync syncing
              full sync: 0/64 shards
              metadata is caught up with master
              incremental sync: 64/64 shards
    data sync source: 1ee9da3e-114d-4ae3-a8a4-056e8a17f532 (us-east)
                      syncing
                      full sync: 0/128 shards
                      incremental sync: 128/128 shards
                      data is caught up with source
Note
Secondary zones accept bucket operations; however, secondary zones redirect bucket operations to the master zone and then synchronize with the master zone to receive the result of the bucket operations. If the master zone is down, bucket operations executed on the secondary zone will fail, but object operations should succeed.
Maintenance
Checking the Sync Status
Information about the replication status of a zone can be queried with:
$ radosgw-admin sync status
        realm b3bc1c37-9c44-4b89-a03b-04c269bea5da (earth)
    zonegroup f54f9b22-b4b6-4a0e-9211-fa6ac1693f49 (us)
         zone adce11c9-b8ed-4a90-8bc5-3fc029ff0816 (us-2)
        metadata sync syncing
              full sync: 0/64 shards
              incremental sync: 64/64 shards
              metadata is behind on 1 shards
              oldest incremental change not applied: 2017-03-22 10:20:00.0.881361s
    data sync source: 341c2d81-4574-4d08-ab0f-5a2a7b168028 (us-1)
                      syncing
                      full sync: 0/128 shards
                      incremental sync: 128/128 shards
                      data is caught up with source
              source: 3b5d1a3f-3f27-4e4a-8f34-6072d4bb1275 (us-3)
                      syncing
                      full sync: 0/128 shards
                      incremental sync: 128/128 shards
                      data is caught up with source
Changing the Metadata Master Zone
Important
Care must be taken when changing which zone is the metadata
master. If a zone has not finished syncing metadata from the current master
zone, it will be unable to serve any remaining entries when promoted to
master and those changes will be lost. For this reason, waiting for a
zone’s radosgw-admin sync status to catch up on metadata sync before
promoting it to master is recommended.
Similarly, if changes to metadata are being processed by the current master
zone while another zone is being promoted to master, those changes are
likely to be lost. To avoid this, shutting down any radosgw instances
on the previous master zone is recommended. After promoting another zone,
its new period can be fetched with radosgw-admin period pull and the
gateway(s) can be restarted.
To promote a zone (for example, zone us-2 in zonegroup us) to metadata
master, run the following commands on that zone:
$ radosgw-admin zone modify --rgw-zone=us-2 --master
$ radosgw-admin zonegroup modify --rgw-zonegroup=us --master
$ radosgw-admin period update --commit
This will generate a new period, and the radosgw instance(s) in zone us-2
will send this period to other zones.
Failover and Disaster Recovery
If the master zone should fail, failover to the secondary zone for disaster recovery.
Make the secondary zone the master and default zone. For example:
# radosgw-admin zone modify --rgw-zone={zone-name} --master --defaultBy default, Ceph Object Gateway will run in an active-active configuration. If the cluster was configured to run in an active-passive configuration, the secondary zone is a read-only zone. Remove the
--read-onlystatus to allow the zone to receive write operations. For example:# radosgw-admin zone modify --rgw-zone={zone-name} --master --default \ --read-only=false
Update the period to make the changes take effect.
# radosgw-admin period update --commitFinally, restart the Ceph Object Gateway.
# systemctl restart ceph-radosgw@rgw.`hostname -s`
If the former master zone recovers, revert the operation.
From the recovered zone, pull the latest realm configuration from the current master zone.
# radosgw-admin realm pull --url={url-to-master-zone-gateway} \
                           --access-key={access-key} --secret={secret}
Make the recovered zone the master and default zone.
# radosgw-admin zone modify --rgw-zone={zone-name} --master --defaultUpdate the period to make the changes take effect.
# radosgw-admin period update --commitThen, restart the Ceph Object Gateway in the recovered zone.
# systemctl restart ceph-radosgw@rgw.`hostname -s`If the secondary zone needs to be a read-only configuration, update the secondary zone.
# radosgw-admin zone modify --rgw-zone={zone-name} --read-onlyUpdate the period to make the changes take effect.
# radosgw-admin period update --commitFinally, restart the Ceph Object Gateway in the secondary zone.
# systemctl restart ceph-radosgw@rgw.`hostname -s`
Migrating a Single Site System to Multi-Site
To migrate from a single site system with a default zone group and
zone to a multi site system, use the following steps:
Create a realm. Replace
<name>with the realm name.# radosgw-admin realm create --rgw-realm=<name> --defaultRename the default zone and zonegroup. Replace
<name>with the zonegroup or zone name.# radosgw-admin zonegroup rename --rgw-zonegroup default --zonegroup-new-name=<name> # radosgw-admin zone rename --rgw-zone default --zone-new-name us-east-1 --rgw-zonegroup=<name>
Configure the master zonegroup. Replace
<name>with the realm or zonegroup name. Replace<fqdn>with the fully qualified domain name(s) in the zonegroup.# radosgw-admin zonegroup modify --rgw-realm=<name> --rgw-zonegroup=<name> --endpoints http://<fqdn>:80 --master --defaultConfigure the master zone. Replace
<name>with the realm, zonegroup or zone name. Replace<fqdn>with the fully qualified domain name(s) in the zonegroup.# radosgw-admin zone modify --rgw-realm=<name> --rgw-zonegroup=<name> \ --rgw-zone=<name> --endpoints http://<fqdn>:80 \ --access-key=<access-key> --secret=<secret-key> \ --master --default
Create a system user. Replace
<user-id>with the username. Replace<display-name>with a display name. It may contain spaces.# radosgw-admin user create --uid=<user-id> --display-name="<display-name>"\ --access-key=<access-key> --secret=<secret-key> --system
Commit the updated configuration.
# radosgw-admin period update --commitFinally, restart the Ceph Object Gateway.
# systemctl restart ceph-radosgw@rgw.`hostname -s`
After completing this procedure, proceed to Configure a Secondary Zone to create a secondary zone in the master zone group.
Multi-Site Configuration Reference
The following sections provide additional details and command-line usage for realms, periods, zone groups and zones.
Realms
A realm represents a globally unique namespace consisting of one or more zonegroups containing one or more zones, and zones containing buckets, which in turn contain objects. A realm enables the Ceph Object Gateway to support multiple namespaces and their configuration on the same hardware.
A realm contains the notion of periods. Each period represents the state of the zone group and zone configuration in time. Each time you make a change to a zonegroup or zone, update the period and commit it.
By default, the Ceph Object Gateway does not create a realm for backward compatibility with Infernalis and earlier releases. However, as a best practice, we recommend creating realms for new clusters.
Create a Realm
To create a realm, execute realm create and specify the realm name.
If the realm is the default, specify --default.
# radosgw-admin realm create --rgw-realm={realm-name} [--default]
For example:
# radosgw-admin realm create --rgw-realm=movies --default
By specifying --default, the realm will be called implicitly with
each radosgw-admin call unless --rgw-realm and the realm name
are explicitly provided.
Make a Realm the Default
One realm in the list of realms should be the default realm. There may be only one default realm. If there is only one realm and it wasn’t specified as the default realm when it was created, make it the default realm. Alternatively, to change which realm is the default, execute:
# radosgw-admin realm default --rgw-realm=movies
Note
When the realm is default, the command line assumes
--rgw-realm=<realm-name> as an argument.
Delete a Realm
To delete a realm, execute realm delete and specify the realm name.
# radosgw-admin realm delete --rgw-realm={realm-name}
For example:
# radosgw-admin realm delete --rgw-realm=movies
Get a Realm
To get a realm, execute realm get and specify the realm name.
#radosgw-admin realm get --rgw-realm=<name>
For example:
# radosgw-admin realm get --rgw-realm=movies [> filename.json]
The CLI will echo a JSON object with the realm properties.
{
    "id": "0a68d52e-a19c-4e8e-b012-a8f831cb3ebc",
    "name": "movies",
    "current_period": "b0c5bbef-4337-4edd-8184-5aeab2ec413b",
    "epoch": 1
}
Use > and an output file name to output the JSON object to a file.
Set a Realm
To set a realm, execute realm set, specify the realm name, and
--infile= with an input file name.
#radosgw-admin realm set --rgw-realm=<name> --infile=<infilename>
For example:
# radosgw-admin realm set --rgw-realm=movies --infile=filename.json
List Realms
To list realms, execute realm list.
# radosgw-admin realm list
List Realm Periods
To list realm periods, execute realm list-periods.
# radosgw-admin realm list-periods
Pull a Realm
To pull a realm from the node containing the master zone group and
master zone to a node containing a secondary zone group or zone, execute
realm pull on the node that will receive the realm configuration.
# radosgw-admin realm pull --url={url-to-master-zone-gateway} --access-key={access-key} --secret={secret}
Rename a Realm
A realm is not part of the period. Consequently, renaming the realm is
only applied locally, and will not get pulled with realm pull. When
renaming a realm with multiple zones, run the command on each zone. To
rename a realm, execute the following:
# radosgw-admin realm rename --rgw-realm=<current-name> --realm-new-name=<new-realm-name>
Note
DO NOT use realm set to change the name parameter. That
changes the internal name only. Specifying --rgw-realm would
still use the old realm name.
Zone Groups
The Ceph Object Gateway supports multi-site deployments and a global namespace by using the notion of zone groups. Formerly called a region in Infernalis, a zone group defines the geographic location of one or more Ceph Object Gateway instances within one or more zones.
Configuring zone groups differs from typical configuration procedures, because not all of the settings end up in a Ceph configuration file. You can list zone groups, get a zone group configuration, and set a zone group configuration.
Create a Zone Group
Creating a zone group consists of specifying the zone group name.
Creating a zone assumes it will live in the default realm unless
--rgw-realm=<realm-name> is specified. If the zonegroup is the
default zonegroup, specify the --default flag. If the zonegroup is
the master zonegroup, specify the --master flag. For example:
# radosgw-admin zonegroup create --rgw-zonegroup=<name> [--rgw-realm=<name>][--master] [--default]
Note
Use zonegroup modify --rgw-zonegroup=<zonegroup-name> to modify
an existing zone group’s settings.
Make a Zone Group the Default
One zonegroup in the list of zonegroups should be the default zonegroup. There may be only one default zonegroup. If there is only one zonegroup and it wasn’t specified as the default zonegroup when it was created, make it the default zonegroup. Alternatively, to change which zonegroup is the default, execute:
# radosgw-admin zonegroup default --rgw-zonegroup=comedy
Note
When the zonegroup is default, the command line assumes
--rgw-zonegroup=<zonegroup-name> as an argument.
Then, update the period:
# radosgw-admin period update --commit
Add a Zone to a Zone Group
To add a zone to a zonegroup, execute the following:
# radosgw-admin zonegroup add --rgw-zonegroup=<name> --rgw-zone=<name>
Then, update the period:
# radosgw-admin period update --commit
Remove a Zone from a Zone Group
To remove a zone from a zonegroup, execute the following:
# radosgw-admin zonegroup remove --rgw-zonegroup=<name> --rgw-zone=<name>
Then, update the period:
# radosgw-admin period update --commit
Rename a Zone Group
To rename a zonegroup, execute the following:
# radosgw-admin zonegroup rename --rgw-zonegroup=<name> --zonegroup-new-name=<name>
Then, update the period:
# radosgw-admin period update --commit
Delete a Zone Group
To delete a zonegroup, execute the following:
# radosgw-admin zonegroup delete --rgw-zonegroup=<name>
Then, update the period:
# radosgw-admin period update --commit
List Zone Groups
A Ceph cluster contains a list of zone groups. To list the zone groups, execute:
# radosgw-admin zonegroup list
The radosgw-admin returns a JSON formatted list of zone groups.
{
    "default_info": "90b28698-e7c3-462c-a42d-4aa780d24eda",
    "zonegroups": [
        "us"
    ]
}
Get a Zone Group Map
To list the details of each zone group, execute:
# radosgw-admin zonegroup-map get
Note
If you receive a failed to read zonegroup map error, run
radosgw-admin zonegroup-map update as root first.
Get a Zone Group
To view the configuration of a zone group, execute:
radosgw-admin zonegroup get [--rgw-zonegroup=<zonegroup>]
The zone group configuration looks like this:
{
    "id": "90b28698-e7c3-462c-a42d-4aa780d24eda",
    "name": "us",
    "api_name": "us",
    "is_master": "true",
    "endpoints": [
        "http:\/\/rgw1:80"
    ],
    "hostnames": [],
    "hostnames_s3website": [],
    "master_zone": "9248cab2-afe7-43d8-a661-a40bf316665e",
    "zones": [
        {
            "id": "9248cab2-afe7-43d8-a661-a40bf316665e",
            "name": "us-east",
            "endpoints": [
                "http:\/\/rgw1"
            ],
            "log_meta": "true",
            "log_data": "true",
            "bucket_index_max_shards": 0,
            "read_only": "false"
        },
        {
            "id": "d1024e59-7d28-49d1-8222-af101965a939",
            "name": "us-west",
            "endpoints": [
                "http:\/\/rgw2:80"
            ],
            "log_meta": "false",
            "log_data": "true",
            "bucket_index_max_shards": 0,
            "read_only": "false"
        }
    ],
    "placement_targets": [
        {
            "name": "default-placement",
            "tags": []
        }
    ],
    "default_placement": "default-placement",
    "realm_id": "ae031368-8715-4e27-9a99-0c9468852cfe"
}
Set a Zone Group
Defining a zone group consists of creating a JSON object, specifying at least the required settings:
name: The name of the zone group. Required.api_name: The API name for the zone group. Optional.is_master: Determines if the zone group is the master zone group. Required. note: You can only have one master zone group.endpoints: A list of all the endpoints in the zone group. For example, you may use multiple domain names to refer to the same zone group. Remember to escape the forward slashes (\/). You may also specify a port (fqdn:port) for each endpoint. Optional.hostnames: A list of all the hostnames in the zone group. For example, you may use multiple domain names to refer to the same zone group. Optional. Thergw dns namesetting will automatically be included in this list. You should restart the gateway daemon(s) after changing this setting.master_zone: The master zone for the zone group. Optional. Uses the default zone if not specified. note: You can only have one master zone per zone group.zones: A list of all zones within the zone group. Each zone has a name (required), a list of endpoints (optional), and whether or not the gateway will log metadata and data operations (false by default).placement_targets: A list of placement targets (optional). Each placement target contains a name (required) for the placement target and a list of tags (optional) so that only users with the tag can use the placement target (i.e., the user’splacement_tagsfield in the user info).default_placement: The default placement target for the object index and object data. Set todefault-placementby default. You may also set a per-user default placement in the user info for each user.
To set a zone group, create a JSON object consisting of the required
fields, save the object to a file (e.g., zonegroup.json); then,
execute the following command:
# radosgw-admin zonegroup set --infile zonegroup.json
Where zonegroup.json is the JSON file you created.
Important
The default zone group is_master setting is true by
default. If you create a new zone group and want to make it the
master zone group, you must either set the default zone group
is_master setting to false, or delete the default zone
group.
Finally, update the period:
# radosgw-admin period update --commit
Set a Zone Group Map
Setting a zone group map consists of creating a JSON object consisting
of one or more zone groups, and setting the master_zonegroup for the
cluster. Each zone group in the zone group map consists of a key/value
pair, where the key setting is equivalent to the name setting
for an individual zone group configuration, and the val is a JSON
object consisting of an individual zone group configuration.
You may only have one zone group with is_master equal to true,
and it must be specified as the master_zonegroup at the end of the
zone group map. The following JSON object is an example of a default
zone group map.
{
    "zonegroups": [
        {
            "key": "90b28698-e7c3-462c-a42d-4aa780d24eda",
            "val": {
                "id": "90b28698-e7c3-462c-a42d-4aa780d24eda",
                "name": "us",
                "api_name": "us",
                "is_master": "true",
                "endpoints": [
                    "http:\/\/rgw1:80"
                ],
                "hostnames": [],
                "hostnames_s3website": [],
                "master_zone": "9248cab2-afe7-43d8-a661-a40bf316665e",
                "zones": [
                    {
                        "id": "9248cab2-afe7-43d8-a661-a40bf316665e",
                        "name": "us-east",
                        "endpoints": [
                            "http:\/\/rgw1"
                        ],
                        "log_meta": "true",
                        "log_data": "true",
                        "bucket_index_max_shards": 0,
                        "read_only": "false"
                    },
                    {
                        "id": "d1024e59-7d28-49d1-8222-af101965a939",
                        "name": "us-west",
                        "endpoints": [
                            "http:\/\/rgw2:80"
                        ],
                        "log_meta": "false",
                        "log_data": "true",
                        "bucket_index_max_shards": 0,
                        "read_only": "false"
                    }
                ],
                "placement_targets": [
                    {
                        "name": "default-placement",
                        "tags": []
                    }
                ],
                "default_placement": "default-placement",
                "realm_id": "ae031368-8715-4e27-9a99-0c9468852cfe"
            }
        }
    ],
    "master_zonegroup": "90b28698-e7c3-462c-a42d-4aa780d24eda",
    "bucket_quota": {
        "enabled": false,
        "max_size_kb": -1,
        "max_objects": -1
    },
    "user_quota": {
        "enabled": false,
        "max_size_kb": -1,
        "max_objects": -1
    }
}
To set a zone group map, execute the following:
# radosgw-admin zonegroup-map set --infile zonegroupmap.json
Where zonegroupmap.json is the JSON file you created. Ensure that
you have zones created for the ones specified in the zone group map.
Finally, update the period.
# radosgw-admin period update --commit
Zones
Ceph Object Gateway supports the notion of zones. A zone defines a logical group consisting of one or more Ceph Object Gateway instances.
Configuring zones differs from typical configuration procedures, because not all of the settings end up in a Ceph configuration file. You can list zones, get a zone configuration and set a zone configuration.
Create a Zone
To create a zone, specify a zone name. If it is a master zone, specify
the --master option. Only one zone in a zone group may be a master
zone. To add the zone to a zonegroup, specify the --rgw-zonegroup
option with the zonegroup name.
# radosgw-admin zone create --rgw-zone=<name> \
                [--zonegroup=<zonegroup-name]\
                [--endpoints=<endpoint>[,<endpoint>] \
                [--master] [--default] \
                --access-key $SYSTEM_ACCESS_KEY --secret $SYSTEM_SECRET_KEY
Then, update the period:
# radosgw-admin period update --commit
Delete a Zone
To delete zone, first remove it from the zonegroup.
# radosgw-admin zonegroup remove --zonegroup=<name>\
                                 --zone=<name>
Then, update the period:
# radosgw-admin period update --commit
Next, delete the zone. Execute the following:
# radosgw-admin zone rm --rgw-zone<name>
Finally, update the period:
# radosgw-admin period update --commit
Important
Do not delete a zone without removing it from a zone group first. Otherwise, updating the period will fail.
If the pools for the deleted zone will not be used anywhere else,
consider deleting the pools. Replace <del-zone> in the example below
with the deleted zone’s name.
Important
Only delete the pools with prepended zone names. Deleting the root
pool, such as, .rgw.root will remove all of the system’s
configuration.
Important
Once the pools are deleted, all of the data within them are deleted in an unrecoverable manner. Only delete the pools if the pool contents are no longer needed.
# ceph osd pool rm <del-zone>.rgw.control <del-zone>.rgw.control --yes-i-really-really-mean-it
# ceph osd pool rm <del-zone>.rgw.data.root <del-zone>.rgw.data.root --yes-i-really-really-mean-it
# ceph osd pool rm <del-zone>.rgw.gc <del-zone>.rgw.gc --yes-i-really-really-mean-it
# ceph osd pool rm <del-zone>.rgw.log <del-zone>.rgw.log --yes-i-really-really-mean-it
# ceph osd pool rm <del-zone>.rgw.users.uid <del-zone>.rgw.users.uid --yes-i-really-really-mean-it
Modify a Zone
To modify a zone, specify the zone name and the parameters you wish to modify.
# radosgw-admin zone modify [options]
Where [options]:
--access-key=<key>--secret/--secret-key=<key>--master--default--endpoints=<list>
Then, update the period:
# radosgw-admin period update --commit
List Zones
As root, to list the zones in a cluster, execute:
# radosgw-admin zone list
Get a Zone
As root, to get the configuration of a zone, execute:
# radosgw-admin zone get [--rgw-zone=<zone>]
The default zone looks like this:
{ "domain_root": ".rgw",
  "control_pool": ".rgw.control",
  "gc_pool": ".rgw.gc",
  "log_pool": ".log",
  "intent_log_pool": ".intent-log",
  "usage_log_pool": ".usage",
  "user_keys_pool": ".users",
  "user_email_pool": ".users.email",
  "user_swift_pool": ".users.swift",
  "user_uid_pool": ".users.uid",
  "system_key": { "access_key": "", "secret_key": ""},
  "placement_pools": [
      {  "key": "default-placement",
         "val": { "index_pool": ".rgw.buckets.index",
                  "data_pool": ".rgw.buckets"}
      }
    ]
  }
Set a Zone
Configuring a zone involves specifying a series of Ceph Object Gateway pools. For consistency, we recommend using a pool prefix that is the same as the zone name. See Pools for details of configuring pools.
To set a zone, create a JSON object consisting of the pools, save the
object to a file (e.g., zone.json); then, execute the following
command, replacing {zone-name} with the name of the zone:
# radosgw-admin zone set --rgw-zone={zone-name} --infile zone.json
Where zone.json is the JSON file you created.
Then, as root, update the period:
# radosgw-admin period update --commit
Rename a Zone
To rename a zone, specify the zone name and the new zone name.
# radosgw-admin zone rename --rgw-zone=<name> --zone-new-name=<name>
Then, update the period:
# radosgw-admin period update --commit
Zone Group and Zone Settings
When configuring a default zone group and zone, the pool name includes the zone name. For example:
default.rgw.control
To change the defaults, include the following settings in your Ceph
configuration file under each [client.radosgw.{instance-name}]
instance.
Name |
Description |
Type |
Default |
|---|---|---|---|
|
The name of the zone for the gateway instance. |
String |
None |
|
The name of the zone group for the gateway instance. |
String |
None |
|
The root pool for the zone group. |
String |
|
|
The root pool for the zone. |
String |
|
|
The OID for storing the default zone group. We do not recommend changing this setting. |
String |
|